How often have you cringed when you thought about writing a windows service? I bet the first thoughts that came to you were:
- I hate having to write an installer or bat file to install the service!
- I hate having to write redundant code to manage the schedule!
- I really don’t like debugging services!
- I would like to write very little code and have the service re-use the code my application or site is using.
Laying out the basics
For simplicity in my example I am going to set these requirements for my service since they are a pretty common reason for needing a service. I will want a service that runs every minute (could be hourly, daily, monthly, etc.) and will run a specific job in my case write to a file.
I’ve found three tools that I’ve found to be extremely useful and take the pain out of it. The first tool is Autofac an IoC (Inversion of Control) container which is the only IoC container supported by Atlas. I use a IoC container so that it can manage my registrations which I pass off to Atlas. Next I use Quartz a job scheduling system which allows us to not worry about setting up timers and triggers, we’ll let Quartz do this for us. Finally I chose Atlas a framework which allows us to write, run, debug and deploy a windows service painlessly.
The Solution
Each time the job is executed I want to create a new container for the job and inject any properties that the job might need. I also want to dispose of the container when the job is complete. So to do this I create a new job Quartz job listener.
public class AutofacJobListener : IJobListener
{
	private readonly IContainerProvider _containerProvider;
	private IUnitOfWorkContainer _container;

	public AutofacJobListener(IContainerProvider containerProvider)
	{
		_containerProvider = containerProvider;
	}

	public void JobToBeExecuted(IJobExecutionContext context)
	{
		_container = _containerProvider.CreateUnitOfWork();
		_container.InjectUnsetProperties(context.JobInstance);
	}

	public void JobExecutionVetoed(IJobExecutionContext context)
	{
		/*noop*/
	}

	public void JobWasExecuted(IJobExecutionContext context, JobExecutionException jobException)
	{
		_container.Dispose();
	}

	public string Name
	{
		get { return "AutofacInjectionJobListener"; }
	}
}
Now let’s create our job. The job will implement the Quartz.IJob. This job is really simple in our case, I will write “Job Executing “ and the date to a file in the directory where the application is running.
public class MyJob : IJob
{
	public void Execute(IJobExecutionContext context)
	{
		//Get the current directory to behave like a normal application, else the service will log to \Windows\System32 folder
		Directory.SetCurrentDirectory(AppDomain.CurrentDomain.BaseDirectory);

		var dateTime = DateTime.Now;
		var sw = new StreamWriter("MyFile.txt",true);

		sw.WriteLine("Job Executing " + dateTime);
		Console.WriteLine("Job Executing " + dateTime);

		sw.Close();
		sw.Dispose();
	}
}
Now its time to setup the actual service and use Atlas. I will inherit off of the Atlas.IAmAHostedProcess and implement the methods. You will notice in the Start method I will use Quartz to create my job, my trigger and schedule it to run.
public class MyService : IAmAHostedProcess
{
	const int IntervalInMinutes = 1;

	public IScheduler Scheduler { get; set; }
	public IJobListener AutofacJobListener { get; set; }

	#region Implementation of IAmAHostedProcess

	public void Start()
	{
		var job = JobBuilder.Create<MyJob>()
			.WithIdentity("Job1")
			.Build();

		var trigger = TriggerBuilder.Create()
			.WithIdentity("Trigger1")
			.StartNow()
			.WithCalendarIntervalSchedule(x => x.WithIntervalInMinutes(IntervalInMinutes))
			.Build();

		Scheduler.ScheduleJob(job, trigger);
		Scheduler.ListenerManager.AddJobListener(AutofacJobListener);

		Scheduler.Start();
	}

	public void Stop()
	{
		Scheduler.Shutdown();
	}

	public void Resume()
	{
		Scheduler.ResumeAll();
	}

	public void Pause()
	{
		Scheduler.PauseAll();
	}
	#endregion
}
Now lets register our Quartz scheduler and the service with autofac.
public class MyAutofacModule : Module
{
	protected override void Load(ContainerBuilder builder)
	{
		LoadQuartz(builder);
		LoadServices(builder);
	}

	private static void LoadQuartz(ContainerBuilder builder)
	{
		builder.Register(c => new StdSchedulerFactory().GetScheduler()).As<IScheduler>().InstancePerLifetimeScope();
		builder.Register(c => new AutofacJobListener(ContainerProvider.Instance)).As<IJobListener>();
	}

	private static void LoadServices(ContainerBuilder builder)
	{
		builder.RegisterType<MyService>().As<IAmAHostedProcess>().PropertiesAutowired();
	}
}
Finally, we will wire up our Main method, the entry point when the console/service runs. We just configure Atlas and tell it to start.
public class Program
{
/// <summary>
/// The main entry point for the application.
/// </summary>
static void Main(string[] args)
{
var configuration = Host.UseAppConfig<MyService>()
.AllowMultipleInstances()
.WithRegistrations(b => b.RegisterModule(new MyAutofacModule()))
.WithArguments(args);
Host.Start(configuration);
}
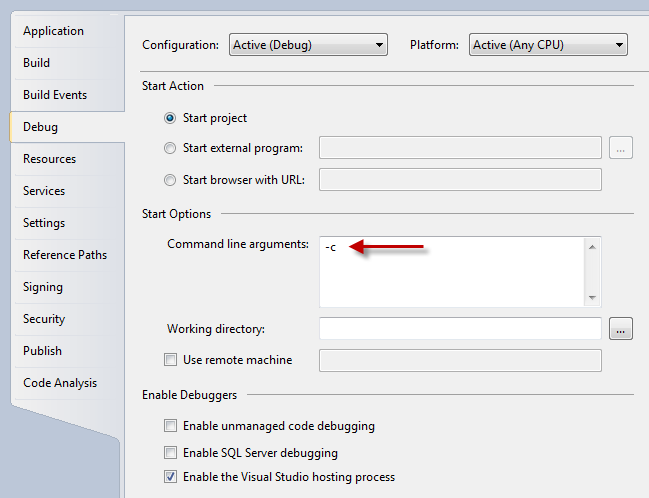
}So now lets go ahead an lets get ready to run the application. Since Atlas can be run as a console application easily by executing it with the following argument –c. Let’s go into the Properties of the project and on the Debug tab set the Command line arguments to be –c
Ok go ahead and run the application, and notice that you can press P to pause the application or click ESC key to exit the application. It will fire every minute both writing to the console and a text file called MyFile.txt.
So now that everything is running correctly and we’re ready to deploy the application, lets do one more thing to make installation a breeze. Lets add an Atlas section to the configuration file with the name, description and user to run as for the service to be installed.
<?xml version="1.0"?>
<configuration>
  <configSections>
    <section name="atlas" type="Atlas.Configuration.XmlConfiguration, Atlas" />
  </configSections>
  <startup>
    <supportedRuntime version="v4.0" sku=".NETFramework,Version=v4.0" />
  </startup>
  <atlas>
    <host name="AtlasExample" displayName="Atlas Sample" description="a sample project for atlas" allowMultipleInstances="true">
      <runtime accounttype="networkservice" startup="automatic" />
    </host>
  </atlas>
</configuration>
Service Installation with Atlas
Alright let’s install the service, watch how easy this is.
- Copy the installation files for the service to a folder where you want the service to run (copy the Bin folder contents to a folder)
- Open a command prompt window to the directory where the service exists.
- Run the following command line AtlasExample.exe –i (to uninstall all you have to do is run these same steps but instead of -i use –u)
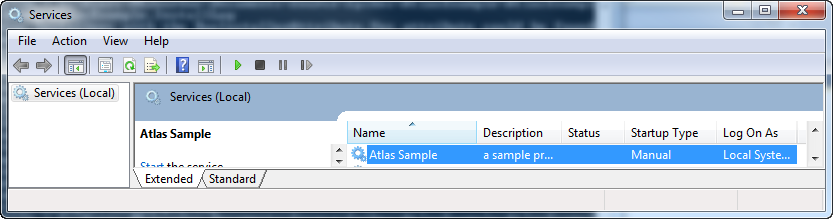
- That’s it! you can now go to the Services manager in windows and find the service is ready to be turned on. Notice the name and description are what we setup inside of the configuration file.
Conclusion
Look at how easy that was! In a matter of 15 minutes I was able to write a service, have it manage scheduling itself, manage memory and registrations efficiently, run as both a console and service and have it self install through a baked in installer. Quartz handles the scheduling and the job, Atlas handles the painless debug and install of the service and autofac manages our containers.
Writing your services like this will allow you to write a single windows service that can be executing a lot of different jobs all at different times or at the same time. It lets you abstract any non-windows service code to be injected into a job using autofac from another class so that code can be shared with other parts of a solution and tested.
I hope my way of writing services is a help to you and that the next time you are asked to write a service you don’t feel like its such a pain to write. I’ve included a copy of the source code for you to download and play with.
view the source code