I've been using browser based ad blockers for several years now. However, I've found many websites are getting smart on finding ways that detect these ad-blockers. So I decided I need to step up my game, plus introduce a way to cut down on advertisements across my entire home network.
After some research I landed on using Pi-hole. I had a raspberry pi already so I felt cost would be minimal if at all. Plus the daily operating cost would be minimal since a raspberry pi uses very little power.
You're probably wondering. What is a Pi-hole and how will it work. It's a pretty simple concept, but will require a little bit of knowledge about DNS setup and what a primary DNS is. If you're not familiar with a primary DNS, I covered it in an earlier post.
How does it work
The Pi-hole is an appliance that sits on your local network. All of your devices will route through it, its the gate between your network and the whole rest of the internet. All of the traffic on your network should route through the Pi-hole appliance. Almost every modern day router makes this simple to accomplish because you can set the default DNS up in the administration console of the router. You can always do this device-by-device. But generally you will want to make sure everything has its ads filtered out.
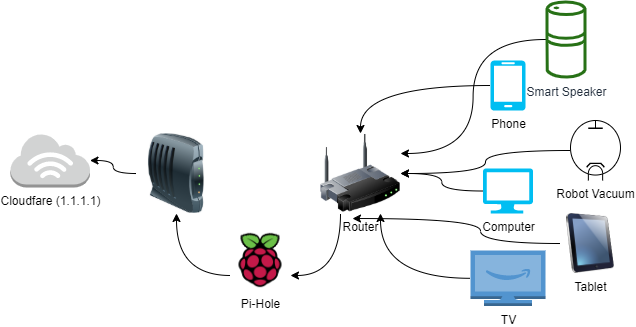
You will see in the image below how this works at a high level.
- All of your devices (Phones, Computers, TV's, IoT devices, etc) will go to your router for a dns entry request.
- The router will then send the traffic to the Pi-hole with the request.
- The Pi-hole looks at its directory for blocked advertisement domains. If it finds one it stops the traffic right there from making the request.
- If the request is not found on the blocked list it will go out to the internet for a formal request. In my case to Cloudfare (1.1.1.1)
Steps for setting up Pi-hole
- Install Raspbian on a Raspberry Pi - I followed the instructions on this site.
- Install Pi-Hole - I used the instructions found in the documentation. Make sure during setup to choose a good primary DNS server, in my case Cloudfare (1.1.1.1)
- Finally set the Pi-hole up as your new primary DNS - Pi-hole documents the steps for several operating systems here.
I found the setup to be a breeze. It was straight forward and I was up and running in about an hour. I started this project with some raspberry pi knowledge and already felt comfortable within the interface. So depending on your level of comfort it might take you some additional time.
After several weeks of running with the pi-hole I found it to be a wonderful addition to the network. I can see it actively blocking the ad-traffic. Almost 25% of the traffic is being filtered out! The only adjustment I've had to make, in the browser search results I can't click any "ad-links", they will never resolve.